安装vagrant和virtualbox
https://www.vagrantup.com/
https://www.virtualbox.org/wiki/Downloads
创建两个目录(一个目录对应一个虚拟机),进入执行vagrant init centos/7初始化,以及vagrant up,然后去吃饭,等待虚拟机装好
D:\vm2>vagrant init centos/7 A `Vagrantfile` has been placed in this directory. You are now ready to `vagrant up` your first virtual environment! Please read the comments in the Vagrantfile as well as documentation on `vagrantup.com` for more information on using Vagrant. D:\vm2>vagrant up Bringing machine 'default' up with 'virtualbox' provider... ==> default: Importing base box 'centos/7'... ==> default: Matching MAC address for NAT networking... ==> default: Checking if box 'centos/7' version '2004.01' is up to date... ==> default: Setting the name of the VM: vm2_default_1608174748422_96033 ==> default: Fixed port collision for 22 => 2222. Now on port 2200. ==> default: Clearing any previously set network interfaces... ==> default: Preparing network interfaces based on configuration... default: Adapter 1: nat ==> default: Forwarding ports... default: 22 (guest) => 2200 (host) (adapter 1) ==> default: Booting VM... ==> default: Waiting for machine to boot. This may take a few minutes... default: SSH address: 127.0.0.1:2200 default: SSH username: vagrant default: SSH auth method: private key default: default: Vagrant insecure key detected. Vagrant will automatically replace default: this with a newly generated keypair for better security. default: default: Inserting generated public key within guest... default: Removing insecure key from the guest if it's present... default: Key inserted! Disconnecting and reconnecting using new SSH key... ==> default: Machine booted and ready! ==> default: Checking for guest additions in VM... default: No guest additions were detected on the base box for this VM! Guest default: additions are required for forwarded ports, shared folders, host only default: networking, and more. If SSH fails on this machine, please install default: the guest additions and repackage the box to continue. default: default: This is not an error message; everything may continue to work properly, default: in which case you may ignore this message. ==> default: Rsyncing folder: /cygdrive/d/vm2/ => /vagrantvagrant会帮我们把虚拟机装好并启动,创建一个vagrant账号,密码vagrant,root账号的密码也是vagrant。同时,在当前的目录下生成一个Vagrantfile文件,我们需要对这个文件做一点小小的修改来保证虚拟机的设置满足k8s需求,以及虚拟机之间的网络可以互通。
# 配置一个公共网络(bridge网络,可以指定ip,也可以不指定,使用默认的dhcp分配地址) config.vm.network "public_network", ip: "192.168.56.10" config.vm.provider "virtualbox" do |vb| # Display the VirtualBox GUI when booting the machine # vb.gui = true # 指定内存和cpu核数 # Customize the amount of memory on the VM: vb.memory = "4096" vb.cpus = 2 end修改好后执行vagrant reload即可重启虚拟机,让配置生效
bridge网络默认虚拟机可以ping其它虚拟机,但宿主机无法ping通虚拟机,如果指定了和宿主机同一个网段(需要确认指定的ip是空闲的),宿主机可以ping通虚拟机,但虚拟机无法ping通宿主机,包括默认的dhcp无法为虚拟机分配ip,这应该和公司的网络有关,如果这台虚拟机想要访问其它机器,应该需要先入域才有权限访问!
关于虚拟机的网络参考文档 https://www.virtualbox.org/manual/ch06.html
这里介绍一下虚拟机几种主要的网络模型:
NAT(Network Address Translatation)
桥接(Bridge)
主机(Host-only)
内部(Internal)
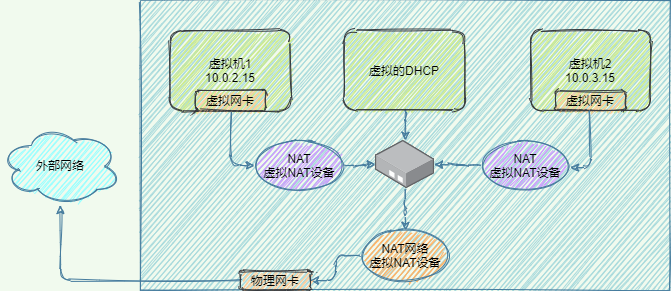
NATNat是Vagrant默认设置的网络模型,虚拟机与物理机并不在同一个网段,虚拟机可以访问外网,访问时需要用NAT虚拟设备进行地址转换,严格来讲NAT有2种实现方式:
NAT:NAT上的虚拟机互相隔离,彼此不能通信,如下图所示,每个虚拟机的虚拟网卡连接着一个虚拟NAT设备(图中紫色NAT,没有橙色的NAT)
NAT网络:NAT网络上的虚拟机可以互通,共享虚拟NAT设备(图中橙色NAT,没有紫色NAT)
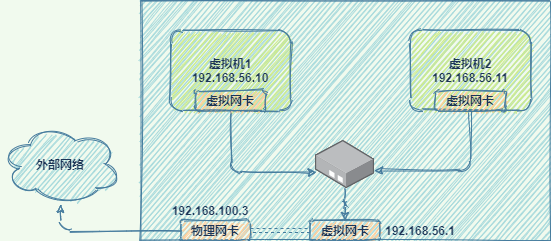
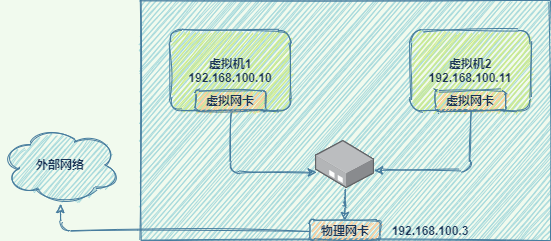
桥接网络简单方便,所有虚拟机和宿主机都在同一个网络中,与宿主机组网的其它机器也可以像访问宿主机一样访问虚拟机,如同一个真实的网络设备一样,是功能最完整的一种网络模型,但缺点是如果虚拟机过多,广播的成本很高
主机网络将网络环境限制在主机内部,默认不能访问外网,主机和虚拟机不在同一个网段,但主机与虚拟机之间、虚拟机和虚拟机之间是互通的(通过配置也可以实现对外网的访问)。在主机上设置物理网卡的属性/共享,将物理网卡和虚拟网卡桥接或共享即可访问外网。