在前面关于DataList 和Repeater 的7章教程里,我们分别创建了只读和可以编辑删除的例子。为了让DataList有编辑和删除的功能,我们在ItemTemplate里添加了一些button,当点击时,引起postback,并根据button的CommandName属性激发相关的事件。例如,添加一个CommandName为“Edit”的button,在postback时会激发EditCommand事件,如果CommandName为“Delete”则激发DeleteCommand。
除了编辑和删除button,DataList和Repeater还可以包含一些当点击时,执行自定义服务器端逻辑的Button,LinkButton和ImageButton。本章我们将创建一个在Repeater里列出categories的界面。每个category都包含一个button,当点击时会列出相关product。见图1。

图 1: 点 “Show Products” 显示目录下所有product
第一步: 添加教程页
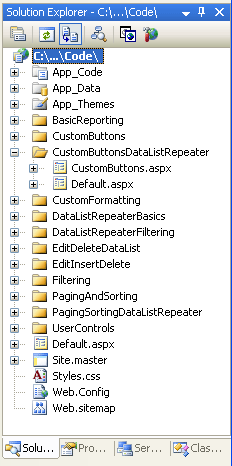
首先添加本章需要的页。添加一个名为CustomButtonsDataListRepeater的文件夹。然后添加下面两个页,记得包含Site.master母板页。
Default.aspx
CustomButtons.aspx

图 2: 添加页
和其它文件夹一样,CustomButtonsDataListRepeater文件夹下的Default.aspx页会列出本部分的教程。和前面一样添加SectionLevelTutorialListing.ascx用户控件。

图 3: 添加 SectionLevelTutorialListing.ascx用户控件
最后,在Web.sitemap里添加这些页的信息。见下面的标记:
<siteMapNode url="~/CustomButtonsDataListRepeater/Default.aspx" title="Adding Custom Buttons to the DataList and Repeater" description="Samples of DataList and Repeater Reports that Include Buttons for Performing Server-Side Actions"> <siteMapNode url="~/CustomButtonsDataListRepeater/CustomButtons.aspx" title="Using Custom Buttons in the DataList and Repeater's Templates" description="Examines how to add custom Buttons, LinkButtons, or ImageButtons within templates." /> </siteMapNode>
完成后浏览该页。见图4。

图 4: 现在的站点地图包含了本章的页
第二步: 添加 Categories列表
我们需要添加一个列出所有categories,每个category都有一个“Show Products” LinkButton的Repeater。点LinkButton时会显示所有category相关的products。我们首先创建一个列出所有categories的Repeater。打开CustomButtons.aspx页,拖一个Repeater进来,将ID设为Categories。然后从智能标签里创建一个名为CategoriesDataSource的ObjectDataSource,用CategoriesBLL类的GetCategories()方法配置它。

图5: 配置ObjectDataSource
Visual Studio会根据数据源为DataList创建一个默认的ItemTemplate,而Repeater的templates需要手工定义。而且Repeater的templates需要直接通过声明代码来创建和修改(也就是说在智能标签上没有“Edit Templates”选项)
点左下角的源视图,添加一个以<h3>显示category name,以段落description的ItemTemplate。并包含一个在每个category之间显示水平线(<hr />)的SeparatorTemplate。同样还要添加一个LinkButton,将Text设为“Show Products”。完成这些后你的页面声明代码应该和下面差不多:
<asp:Repeater DataSourceID="CategoriesDataSource" runat="server"> <ItemTemplate> <h3><%# Eval("CategoryName") %></h3> <p> <%# Eval("Description") %> [<asp:LinkButton runat="server"> Show Products</asp:LinkButton>] </p> </ItemTemplate> <SeparatorTemplate><hr /></SeparatorTemplate> </asp:Repeater> <asp:ObjectDataSource runat="server" OldValuesParameterFormatString="original_{0}" SelectMethod="GetCategories" TypeName="CategoriesBLL"> </asp:ObjectDataSource>
图6是浏览该页的样子。每个category name和description都被列出来。当点“Show Products” button时会引起postback,但是还不执行任何功能。

图 6: 每个 Category'的Name 和 Description 和 “Show Products” LinkButton一起列出
第三步:当点“Show Products” LinkButton 时执行服务器端代码
