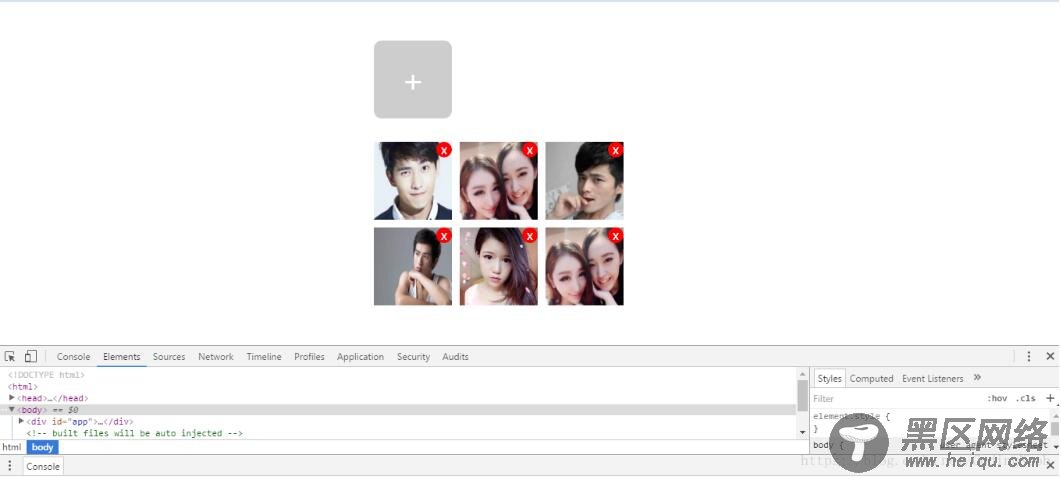
最近项目一直在使用vue,以前只是用vue做过一些简单的demo对数据进行增删改,并没有用于实际开发项目。今天就想了解一下如何用vue实现常见的图片上传前本地预览效果。
效果预览:
<template> <div> <div> <input type="file" @change="getImgBase()"> <div>+</div> </div> <div> <div v-for="(item, index) in imgBase64"> <span @click="delImg(index)">x</span> <img :src="item"> </div> </div> </div> </template> <script> export default { name: 'imageView', data (){ return { imgBase64:[] //存储img base64的值将值传给后端处理 } }, methods: { //获取图片base64实现预览 getImgBase(){ var _this = this; var event = event || window.event; var file = event.target.files[0]; var reader = new FileReader(); //转base64 reader.onload = function(e) { _this.imgBase64.push(e.target.result); } reader.readAsDataURL(file); }, //删除图片 delImg(index){ this.imgBase64.splice(index,1); } } } </script> <style scoped> *{margin:0 auto;padding:0;font-family:"微软雅黑";} .clearboth::after{ content:""; display:block; clear:both; } .image-view{ width:400px; height:300px; margin:50px auto; } .image-view .addbox{ float:left; position:relative; height:100px; width:100px; margin-bottom:20px; text-align:center; } .image-view .addbox input{ position:absolute; left:0; height:100px; width:100px; opacity:0; } .image-view .addbox .addbtn{ float:left; height:100px; width:100px; line-height:100px; color:#fff; font-size:40px; background:#ccc; border-radius:10px; } .image-view .item { position:relative; float:left; height:100px; width:100px; margin:10px 10px 0 0; } .image-view .item .cancel-btn{ position:absolute; right:0; top:0; display:block; width:20px; height:20px; color:#fff; line-height:20px; text-align:center; background:red; border-radius:10px; cursor:pointer; } .image-view .item img{ width:100%; height:100%; } .image-view .view{ clear:both; } </style>