第一步是先把当前图片往右边移动一步,之前我们说的 index * -100% 让任何一张在 index 位置的图片移动到当前位置的公式,那么要再往右边移动多一个位置,那就是 (index + 1) * -100% 即可
第二步就是让下一张图移动到当前显示的位置,这个就是直接用 index * -100% 咯
最后我们还需要更新一次我们记录, currentIndex = nextIndex,这样就大功告成了!
接下来我们把上面的逻辑翻译成 JavaScript:
class Carousel extends Component { // 结构函数 // 建设 DOM 节点 constructor() { super(); this.attributes = Object.create(null); } setAttribute(name, value) { this.attributes[name] = value; } render() { this.root = document.createElement('div'); this.root.classList.add('carousel'); for (let picture of this.attributes.src) { let child = document.createElement('div'); child.style.backgroundImage = `url('${picture}')`; this.root.appendChild(child); } // 当前图片的 index let currentIndex = 0; setInterval(() => { let children = this.root.children; // 下一张图片的 index let nextIndex = (currentIndex + 1) % children.length; // 当前图片的节点 let current = children[currentIndex]; // 下一张图片的节点 let next = children[nextIndex]; // 禁用图片的动效 next.style.transition = 'none'; // 移动下一张图片到正确的位置 next.style.transform = `translateX(${-100 * (nextIndex - 1)}%)`; // 执行轮播结果,延迟了一帧的时间 16 毫秒 setTimeout(() => { // 启用 CSS 中的动效 next.style.transition = ''; // 先移动当前图片分开当前位置 current.style.transform = `translateX(${-100 * (currentIndex + 1)}%)`; // 移动下一张图片到当前显示的位置 next.style.transform = `translateX(${-100 * nextIndex}%)`; // 最后更新当前位置的 index currentIndex = nextIndex; }, 16); }, 3000); return this.root; } mountTo(parent) { parent.appendChild(this.render()); } }
假如我们先去掉 overflow: hidden 的话,我们就可以很清晰的看到所有图片移动的轨迹了:

一般来说我们的轮播组件除了这种自动轮播的成果之外,尚有可以利用我们的鼠标举办拖动来轮播。所以接下来我们一起来实现这个手动轮播成果。
因为自动轮播和手动轮播是有必然的斗嘴的,所以我们需要把我们前面实现的自动轮播的代码给注释掉。然后我们就可以利用这个轮播组件下的 children (子元素),也就是所有图片的元素,来实现我们的手动拖拽轮播成果。
那么拖拽的成果主要就是涉及我们的图片被拖动,所以我们需要给图片插手鼠标的监听事件。假如我们按照操纵步调来想的话,就可以整理出这么一套逻辑:
我们必定是需要先把鼠标移动到图片之上,然后点击图片。所以我们第一个需要监听的事件一定就是 mousedown 鼠标按下事件。点击了鼠标之后,那么我们就会开始移动我们的鼠标,让我们的图片跟从我们鼠标移动的偏向去走。这个时候我们就要监听 mousemove 鼠标移动事件。当我们把图片拖动到我们想要的位置之后,我们就会松开我们鼠标的按键,这个时候也是我们要计较这个图片是否可以轮播的时候,这个就需要我们监听 mouseup 鼠标松开事件。
this.root.addEventListener('mousedown', event => { console.log('mousedown'); }); this.root.addEventListener('mousemove', event => { console.log('mousemove'); }); this.root.addEventListener('mouseup', event => { console.log('mouseup'); });
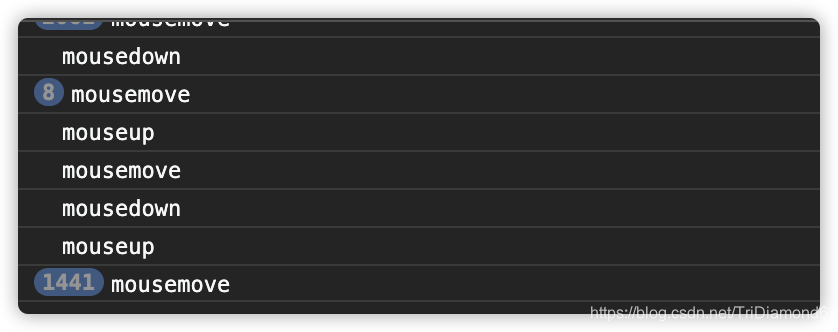
执行一下以上代码后,我们就会在 console 中看到,当我们鼠标放到图片上而且移动时,我们会不绝的触发 mousemove。可是我们想要的结果是,当我们鼠标按住时移动才会触发 mousemove,我们鼠标纯真在图片上移动是不该该触发事件的。
所以我们需要把 mousemove 和 mouseup 两个事件,放在 mousedown 事件的回调函数傍边,这样才气正确的在鼠标按住的时候监听移动和松开两个行动。这里还需要思量,当我们 mouseup 的时候,我们需要把 mousemove 和 mouseup 两个监听事件给停掉,所以我们需要用函数把它们单独的存起来。