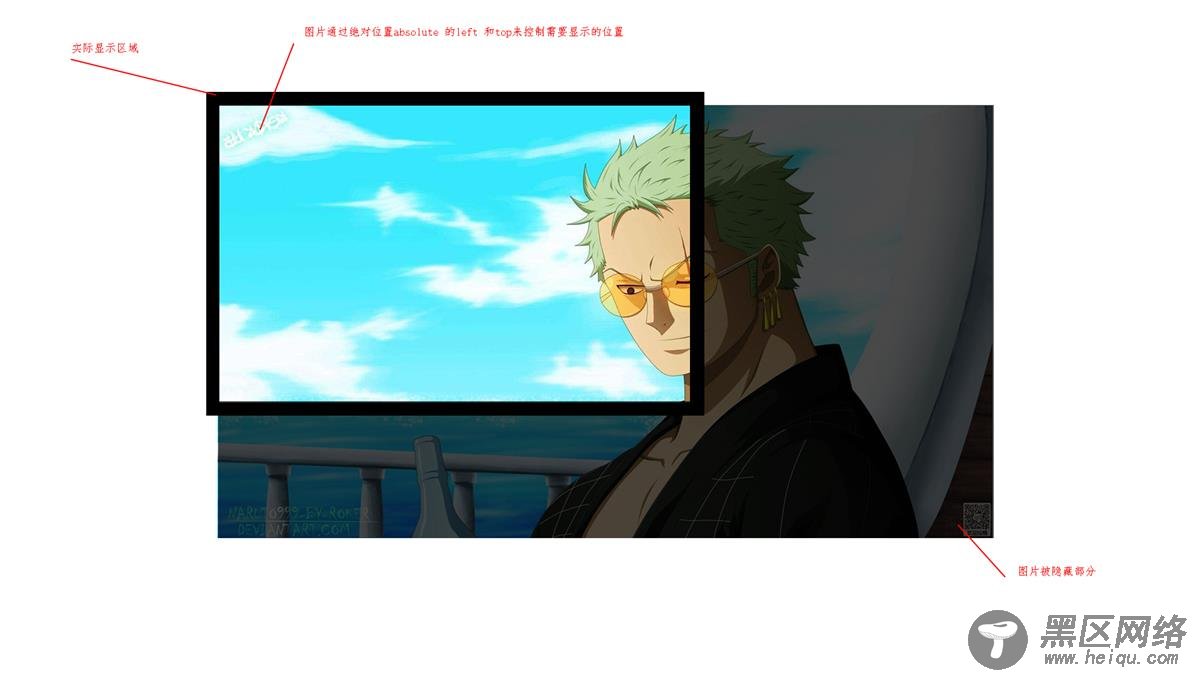
当图片比要显示的区域大时,需要将多余的部分隐藏掉,我们可以通过绝对定位来实现,并通过动态修改图片的left值和top值从而实现图片的移动。具体实现效果如下图,如果我们移动的是div 实现思路相仿。
此处需要注意的是
我们在移动图片时,需要通过draggable="false" 将图片的 <img src="https://www.jb51.net/static/pano-dev/test/image-2.jpg" draggable="false" />,否则按下鼠标监听onmousemove事件时监听不到
然后还需要禁用图片的选中css
/*禁止元素选中*/ -moz-user-select: none; /*火狐*/ -webkit-user-select: none; /*webkit浏览器*/ -ms-user-select: none; /*IE10*/ -khtml-user-select: none; /*早期浏览器*/ user-select: none;
Vue 代码
<style lang="less" scoped> @import url("./test.less"); </style> <template> <div> <div> <div ref="imageShowBox"> <div ref="dragContainer" :style="'left:' + dragContainer.newPoint.left+'px; top:' + dragContainer.newPoint.top+'px'" @mousedown="DragContainerMouseDown"> <div> <img src="https://www.jb51.net/static/pano-dev/test/image-2.jpg" draggable="false" /> <div @mousedown="PointMouseDown"></div> </div> </div> </div> </div> </div> </template> <script> export default { data() { return { dragContainer: { box: { w: 0, h: 0 }, point: { left: 0, top: 0 }, newPoint: { left: 0, top: 0 } }, mousePoint: { x: 0, y: 0 }, imageShowBox: { box: { w: 0, h: 0 }, dragcheck: { h: true, v: true } } }; }, updated() { let _this = this; // 确保DOM元素已经渲染成功,然后获取拖拽容器和显示区域的大小 _this.$nextTick(function() { _this.dragContainer.box = { w: _this.$refs.dragContainer.offsetWidth, h: _this.$refs.dragContainer.offsetHeight }; _this.imageShowBox.box = { w: _this.$refs.imageShowBox.offsetWidth, h: _this.$refs.imageShowBox.offsetHeight }; // 判断是否允许拖拽 _this.imageShowBox.dragcheck = { h: _this.imageShowBox.box.w > _this.dragContainer.box.w ? false : true, v: _this.imageShowBox.box.h > _this.dragContainer.box.h ? false : true }; }); }, methods: { // 鼠标在拖拽容器中按下时触发 DragContainerMouseDown(e) { const _this = this; // 记录鼠标点击时的初始坐标 this.mousePoint = { x: e.clientX, y: e.clientY }; _this.dragContainer.point = _this.dragContainer.newPoint; document.body.onmousemove = _this.DragContainerMouseMove; document.onmouseup = _this.DragContainerMouseUp; return false; }, // 容器拖拽时触发 DragContainerMouseMove(e) { const _this = this; // 鼠标偏移量 = 初始坐标 - 当前坐标 let dx = e.clientX - _this.mousePoint.x; let dy = e.clientY - _this.mousePoint.y; // 获取拖拽容器移动后的left和top值 if (_this.imageShowBox.dragcheck.h) var newx = dx > 0 ? Math.min(0, _this.dragContainer.point.left + dx) : Math.max(- _this.dragContainer.box.w + _this.imageShowBox.box.w, _this.dragContainer.point.left + dx ); if (_this.imageShowBox.dragcheck.v) var newy = dy > 0 ? Math.min(0, _this.dragContainer.point.top + dy) : Math.max(- _this.dragContainer.box.h + _this.imageShowBox.box.h, _this.dragContainer.point.top + dy ); _this.dragContainer.newPoint = { left: typeof newx != 'undefined' ? newx : _this.dragContainer.point.left, top: typeof newy != 'undefined' ? newy : _this.dragContainer.point.top }; console.log(_this.dragContainer.newPoint); return false; }, // 移动完成 取消onmousemove和onmouseup事件 DragContainerMouseUp(e) { document.body.onmousemove = null; document.onmouseup = null; }, PointMouseDown(e) { //阻止事件冒泡 e.stopPropagation(); } } }; </script>
样式表
.page { background: #444; width: 100%; height: 100%; position: relative; .image-move-wapper { position: absolute; right: 50px; top: 50px; background: #fff; box-shadow: rgba(255, 255, 255, 0.5); padding: 10px; } .image-show-box { height: 400px; width: 400px; cursor: move; overflow: hidden; position: relative; .drag-container { position: absolute; left: 0px; top: 0; /*禁止元素选中*/ -moz-user-select: none; /*火狐*/ -webkit-user-select: none; /*webkit浏览器*/ -ms-user-select: none; /*IE10*/ -khtml-user-select: none; /*早期浏览器*/ user-select: none; .drag-image-box { position: relative; .point { position: absolute; background: red; height: 30px; width: 30px; border-radius: 50%; } } } } }
总结
以上所述是小编给大家介绍的基于Vue实现图片在指定区域内移动的思路详解,希望对大家有所帮助,如果大家有任何疑问欢迎给我留言,小编会及时回复大家的!
您可能感兴趣的文章: