
一、varnish的基础知识
Varnish工作原理
1、varnish工作原理
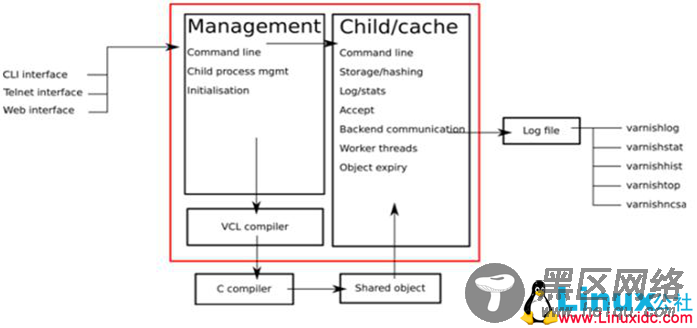
客户端请求到达varnish代理,child线程中的accept接收下请求进程,交给worker threads处理,worker threads先去object expiry找缓存,没找到就去上游服务器backend lcatinon找到资源,返回varnish代理,查看是否符合缓存规则,符合则缓存,不符合则直接返回给客户端
2、缓存分类
代理缓存:客户端请求代理,先去找缓存,缓存没有,代理会去上游服务器找到资源,并缓存在代理,然后返回给客户端
旁路缓存:客户端去缓存找缓存,缓存没命中返回客户端,客户端去上游服务器找到资源返回到本地,然后再把资源缓存到缓存
3、Memcache适用的场景
memcache的缺点:不能适应实时更新,如果实时更新,缓存不命中,命中率低。
memcache支持分布式缓存,有mysql主从就不需要memcache,memcache适合多台mysql集群环境,此时直接到mysql缓存取查询性能较好
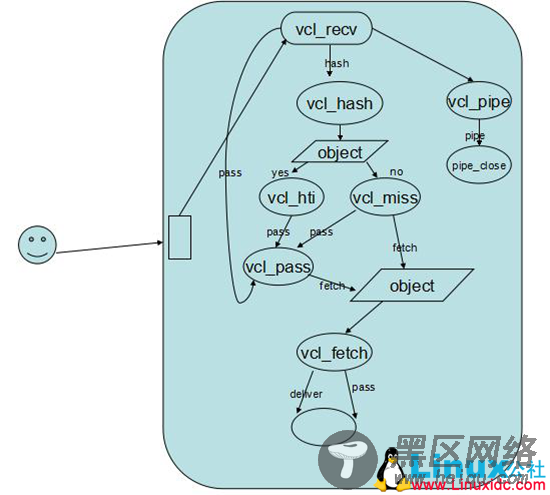
4、varnish各状态引擎的功用:
vcl_recv:实现安全策略,仅处理可以识别http方法,且只缓存get和head的方法,不缓存用户特有的数据(根据客户端的请求作出的缓存策略)
vcl_fetch:根据服务端的响应作出的策略缓存
vcl_pipe: 用于将请求直接发往后端主机;
vcl_hash: 自定义hash生成时的数据来源
vcl_pass: 用于将请求直接传递至后端主机;
vcl_hit: 从缓存中查找到缓存对象时要执行的操作;
vcl_miss: 从缓存中款查找到缓存对象时要执行的操作;
vcl_deliver: 将用户请求的内容响应给客户端时用到的方法;
vcl_error: 在varnish端合成错误响应时的缓存策略;
5、Varnish缓存的原理
------------------------------------------------------------
CentOS 5.8下Varnish-2.1.5的安装配置
RedHat脚本改用CentOS源更新安装Nginx、PHP 5.3、Varnish
Linux下Varnish缓存的配置优化
-----------------------------------------------------------------------------------
二、varnish的实验
Node1 172.16.11.143 centos6.5+varnish
Node2 172.16.11.144 centos6.5+http
1、软件安装
varnish-libs-3.0.5-1.el6.x86_64.rpm
varnish-3.0.5-1.el6.x86_64.rpm
varnish-docs-3.0.5-1.el6.x86_64.rpm
node1
rpm -ivh varnish-libs-3.0.5-1.el6.x86_64.rpm varnish-3.0.5-1.el6.x86_64.rpm
/etc/logrotate.d/varnish #滚动日志
/etc/rc.d/init.d/varnish #服务
/etc/rc.d/init.d/varnishlog #日志
/var/lib/varnish #共享缓存
/var/log/varnish #日志存放
/etc/varnish/default.vcl #配置文件
2、简单的代理配置
node1
VARNISH_LISTEN_PORT=80
VARNISH_STORAGE_SIZE=64M #设置缓存大小
#
# # Backend storage specification
#VARNISH_STORAGE="file,${VARNISH_STORAGE_FILE},${VARNISH_STORAGE_SIZE}”
VARNISH_STORAGE="malloc,${VARNISH_STORAGE_SIZE}" #缓存名字叫什么
Vim /etc/varnish/default.vcl
backend default {
.host = "172.16.11.144";
.port = "80";
}
Service varnish restart
Ss -tnl #查看端口是否监听
Node2
Yum install httpd -y
Vim /var/www/html/index.html
<h1>node2</h1>
Service httpd restart
Chkconfig --add httpd
Chkconfig httpd on
3、让后端服务器可以查看是那个客户端访问自己的
Node1
Cp /etc/varnish/default.vcl /etc/varnish/test.vcl
Vim /etc/varnish/test.vcl
sub vcl_recv {
if (req.restarts == 0) {
if (req.http.x-forwarded-for) {
set req.http.X-Forwarded-For =
req.http.X-Forwarded-For + ", " + client.ip;
} else {
set req.http.X-Forwarded-For = client.ip;
}
}
return (lookup);
}
[root@localhost ~]# varnishadm -S /etc/varnish/secret -T 127.0.0.1:6082
varnish> vcl.list #查看哪些可用
200
active 2 boot
available 0 test1
varnish> vcl.load test1 test1.vcl #编译
200
VCL compiled.
varnish> vcl.use test1 #使用
200
varnish> vcl.list #查看具体可用
200
available 2 boot
active 0 test1
Node2
Vim //etc/httpd/conf/httpd.conf
LogFormat "%{X-Forwarded-For}i %l %u %t \"%r\" %>s %b \"%{Referer}i\" \"%{User-Agent}i\"" combined
Service httpd reload
#####################################################################################
浏览器测试 http://172.16.11.143
Node2
tail /var/log/httpd/access_log