
无论Oracle还是mysql数据库都有分区的概念,即同一张表物理上不在同一台机器上,有效缓解了表都集中存在一台机器的压力。当然,mongodb也有类似的机制,即是分片。具体理论知识大家可以参考网上文档,我这里只记录下具体操作步骤
dc166a30dd685af75d234808f3f9cdf6.png
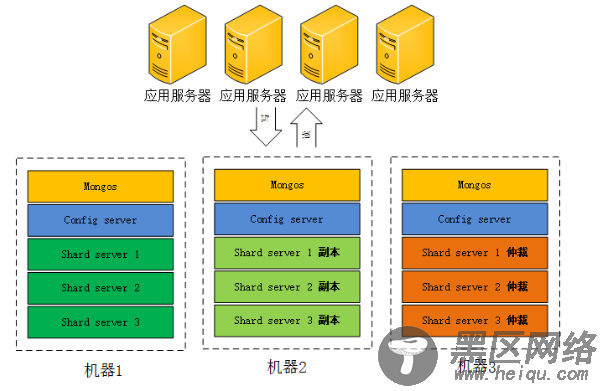
参考网络上一个图。我选用的是2个副本集+1个仲裁。实际上我这里分片集群需要3个mongos,3个config server,数据分片3个shard server,对应着还有3个副本,3个仲裁节点,总共需要15个实例。因为我资源确实紧张,又不想影响实验效果。冥思苦想了一阵,索性在一台机器上实现得了,分给不同的实例以不同的端口就好了。
闲话少说,开始搞起!!!
1. 资源划分(感觉这是最纠结的一步)
2. mongdb的安装
这个可以参考博主的前一篇章进行安装高可用mongodb集群的学习记录(一安装配置MongoDB)
3.创建所需要的目录
#创建所需要的目录
[root@DB mongodb]# mkdir -p mongos{1..3}/log
[root@DB mongodb]# mkdir -p config{1..3}/log
[root@DB mongodb]# mkdir -p config{1..3}/data
[root@DB mongodb]# mkdir -p shard{1..3}_{1..3}/log
[root@DB mongodb]# mkdir -p shard{1..3}_{1..3}/data
4. 启动每一个配置服务器
#启动配置服务器
mongod --configsvr --dbpath config1/data --port 21001 --logpath config1/log/config.log --fork
mongod --configsvr --dbpath config2/data --port 21002 --logpath config2/log/config.log --fork
mongod --configsvr --dbpath config3/data --port 21003 --logpath config3/log/config.log --fork
5.启动mongos服务器
mongos --configdb 192.168.221.160:21001,192.168.221.160:21002,192.168.221.160:21003 --port 20001 --logpath mongos1/log/mongos.log --fork
mongos --configdb 192.168.221.160:21001,192.168.221.160:21002,192.168.221.160:21003 --port 20002 --logpath mongos2/log/mongos.log --fork
mongos --configdb 192.168.221.160:21001,192.168.221.160:21002,192.168.221.160:21003 --port 20003 --logpath mongos3/log/mongos.log --fork
6.启动分片的副本集
mongod --shardsvr --replSet shard1 --port 21101 --dbpath shard1_1/data --logpath shard1_1/log/shard.log --fork --nojournal --oplogSize 10
mongod --shardsvr --replSet shard1 --port 21201 --dbpath shard1_2/data --logpath shard1_2/log/shard.log --fork --nojournal --oplogSize 10
mongod --shardsvr --replSet shard1 --port 21301 --dbpath shard1_3/data --logpath shard1_3/log/shard.log --fork --nojournal --oplogSize 10
mongod --shardsvr --replSet shard2 --port 21102 --dbpath shard2_1/data --logpath shard2_1/log/shard.log --fork --nojournal --oplogSize 10
mongod --shardsvr --replSet shard2 --port 21202 --dbpath shard2_2/data --logpath shard2_2/log/shard.log --fork --nojournal --oplogSize 10
mongod --shardsvr --replSet shard2 --port 21302 --dbpath shard2_3/data --logpath shard2_3/log/shard.log --fork --nojournal --oplogSize 10
mongod --shardsvr --replSet shard3 --port 21103 --dbpath shard3_1/data --logpath shard3_1/log/shard.log --fork --nojournal --oplogSize 10
mongod --shardsvr --replSet shard3 --port 21203 --dbpath shard3_2/data --logpath shard3_2/log/shard.log --fork --nojournal --oplogSize 10
mongod --shardsvr --replSet shard3 --port 21303 --dbpath shard3_3/data --logpath shard3_3/log/shard.log --fork --nojournal --oplogSize 10
7.分别对每个分片配置副本集,任意登录一个节点
#设置第一个分片副本集
[root@DB ~]# mongo 192.168.221.160:21101
MongoDB shell version: 3.0.6
connecting to: 192.168.221.160:21101/test
> use admin
switched to db admin
#定义副本集配置信息
> config = {_id:"shard1",members:[{_id:0,host:"192.168.221.160:21101"},{_id:1,host:"192.168.221.160:21201"},{_id:2,host:"192.168.221.160:21301",arbiterOnly:true}]}
{
"_id" : "shard1",
"members" : [
{
"_id" : 0,
"host" : "192.168.221.160:21101"
},
{
"_id" : 1,
"host" : "192.168.221.160:21201"
},
{
"_id" : 2,
"host" : "192.168.221.160:21301",
"arbiterOnly" : true
}
]
}
#初始化副本集信息
> rs.initiate(config)
{ "ok" : 1 }
shard1:OTHER>
#设置第二个分片副本集
[root@DB ~]# mongo 192.168.221.160:21102
MongoDB shell version: 3.0.6
connecting to: 192.168.221.160:21102/test
> use admin
switched to db admin
> config = {_id:"shard2",members:[{_id:0,host:"192.168.221.160:21102"},{_id:1,host:"192.168.221.160:21202"},{_id:2,host:"192.168.221.160:21302",arbiterOnly:true}]}
{
"_id" : "shard2",
"members" : [
{
"_id" : 0,
"host" : "192.168.221.160:21102"
},
{
"_id" : 1,
"host" : "192.168.221.160:21202"
},
{
"_id" : 2,
"host" : "192.168.221.160:21302",
"arbiterOnly" : true
}
]
}
> rs.initiate(config)
{ "ok" : 1 }
shard2:OTHER>
#设置第三个分片副本集
[root@DB ~]# mongo 192.168.221.160:21103
MongoDB shell version: 3.0.6
connecting to: 192.168.221.160:21103/test
> use admin
switched to db admin
> config = {_id:"shard3",members:[{_id:0,host:"192.168.221.160:21103"},{_id:1,host:"192.168.221.160:21203"},{_id:2,host:"192.168.221.160:21303",arbiterOnly:true}]}
{
"_id" : "shard3",
"members" : [
{
"_id" : 0,
"host" : "192.168.221.160:21103"
},
{
"_id" : 1,
"host" : "192.168.221.160:21203"
},
{
"_id" : 2,
"host" : "192.168.221.160:21303",
"arbiterOnly" : true
}
]
}
> rs.initiate(config)
{ "ok" : 1 }
shard3:OTHER>
8.登录到每一个mongos,设置分片配置,让分片生效
#串联路由服务器与分片副本集1
[root@DB ~]# mongo 192.168.221.160:20001
MongoDB shell version: 3.0.6
connecting to: 192.168.221.160:20001/test
Server has startup warnings:
2017-11-15T13:51:20.732+0800 I CONTROL ** WARNING: You are running this process as the root user, which is not recommended.
2017-11-15T13:51:20.733+0800 I CONTROL
mongos> use admin
switched to db admin
mongos> db.runCommand({addshard:"shard1/192.168.221.160:21101,192.168.221.160:21201,192.168.221.160:21301"})
{ "shardAdded" : "shard1", "ok" : 1 }
mongos>
#串联路由服务器与分片副本集2
[root@DB ~]# mongo 192.168.221.160:20002
MongoDB shell version: 3.0.6
connecting to: 192.168.221.160:20002/test
Server has startup warnings:
2017-11-15T13:51:43.660+0800 I CONTROL ** WARNING: You are running this process as the root user, which is not recommended.
2017-11-15T13:51:43.661+0800 I CONTROL
mongos> use admin
switched to db admin
mongos> db.runCommand({addshard:"shard2/192.168.221.160:21102,192.168.221.160:21202,192.168.221.160:21302"})
{ "shardAdded" : "shard2", "ok" : 1 }
mongos>
#串联路由服务器与分片副本集3
[root@DB ~]# mongo 192.168.221.160:20003
MongoDB shell version: 3.0.6
connecting to: 192.168.221.160:20003/test
Server has startup warnings:
2017-11-15T13:51:59.589+0800 I CONTROL ** WARNING: You are running this process as the root user, which is not recommended.
2017-11-15T13:51:59.589+0800 I CONTROL
mongos> use admin
switched to db admin
mongos> db.runCommand({addshard:"shard3/192.168.221.160:21103,192.168.221.160:21203,192.168.221.160:21303"})
{ "shardAdded" : "shard3", "ok" : 1 }
mongos>
9.查看分片服务器的配置信息:
mongos> db.runCommand({listshards:1})
{
"shards" : [
{
"_id" : "shard1",
"host" : "shard1/192.168.221.160:21101,192.168.221.160:21201"
},
{
"_id" : "shard2",
"host" : "shard2/192.168.221.160:21102,192.168.221.160:21202"
},
{
"_id" : "shard3",
"host" : "shard3/192.168.221.160:21103,192.168.221.160:21203"
}
],
"ok" : 1
}
mongos>
仲裁节点不储存数据,没有在这里显示出来
10.连接mongos上,指定数据库、指定集合让分片生效
[root@DB ~]# mongo 192.168.221.160:20001
MongoDB shell version: 3.0.6
connecting to: 192.168.221.160:20001/test
mongos> db.runCommand({enablesharding:"testdb"})
{
"ok" : 0,
"errmsg" : "enableSharding may only be run against the admin database.",
"code" : 13
}
mongos> use admin
switched to db admin
mongos> db.runCommand({enablesharding:"testdb"})
{ "ok" : 1 }
mongos> db.runCommand({shardcollection:"testdb.table1",key:{id:1}})
{ "collectionsharded" : "testdb.table1", "ok" : 1 }
mongos>
设置testdb的 table1 表需要分片,根据 id 自动分片到 shard1 ,shard2,shard3 上面去。要这样设置是因为不是所有mongodb 的数据库和表都需要分片
11.测试分片片配置效果
[root@DB ~]# mongo 192.168.221.160:20001
MongoDB shell version: 3.0.6
connecting to: 192.168.221.160:20001/test
Server has startup warnings:
2017-11-15T13:51:20.732+0800 I CONTROL ** WARNING: You are running this process as the root user, which is not recommended.
2017-11-15T13:51:20.733+0800 I CONTROL
mongos> use testdb;
switched to db testdb
mongos> for (var i = 1;i<=10000;i++) db.table1.save({id:i,"test1":"item1"})
WriteResult({ "nInserted" : 1 })
mongos> db.table1.stats()
{
"sharded" : true,
"paddingFactorNote" : "paddingFactor is unused and unmaintained in 3.0. It remains hard coded to 1.0 for compatibility only.",
"userFlags" : 1,
"capped" : false,
"ns" : "testdb.table1",
"count" : 10000,
"numExtents" : 7,
"size" : 1120000,
"storageSize" : 2809856,
"totalIndexSize" : 654080,
"indexSizes" : {
"_id_" : 351568,
"id_1" : 302512
},
"avgObjSize" : 112,
"nindexes" : 2,
"nchunks" : 3,
"shards" : {
"shard1" : {
"ns" : "testdb.table1",
"count" : 9991,
"size" : 1118992,
...
"ok" : 1,
"$gleStats" : {
"lastOpTime" : Timestamp(0, 0),
"electionId" : ObjectId("5a0bd9cf86a6b76e11b5d820")
}
},
"shard2" : {
"ns" : "testdb.table1",
"count" : 1,
"size" : 112,
...
"ok" : 1,
"$gleStats" : {
"lastOpTime" : Timestamp(0, 0),
"electionId" : ObjectId("5a0bdadd74c5945a33a4ae46")
}
},
"shard3" : {
"ns" : "testdb.table1",
"count" : 8,
"size" : 896,
...
"ok" : 1,
"$gleStats" : {
"lastOpTime" : Timestamp(0, 0),
"electionId" : ObjectId("5a0bdb6f1c75115f41ff92f9")
}
}
},
"ok" : 1
}
mongos>
可以看到testdb.table1数据已经被分到三个分片,各自分片数量为 shard1 “count” : 9991,shard2 “count” : 1,shard3 “count” : 8。我也不知道为啥分配的不均匀。纳闷ing
好了,实验到此结束,关于mongodb的学习会继续进行...
更多MongoDB相关教程见以下内容:
Linux CentOS 6.5 yum安装MongoDB
Ubuntu 16.04中安装MongoDB3.4数据库系统