
MHA:Master High Availability,对主节点进行监控,可实现自动故障转移至其他从节点;通过提升某一从节点为新的主节点,基于主从复制实现,还需要客户端配合实现,目前MHA主要支持一主二从,即一台充当master,一台充当备用master,另外一台充当从数据库,出于机器成本的考虑,淘宝进行了改造,目前淘宝TMHA已经一主一从。
MHA架构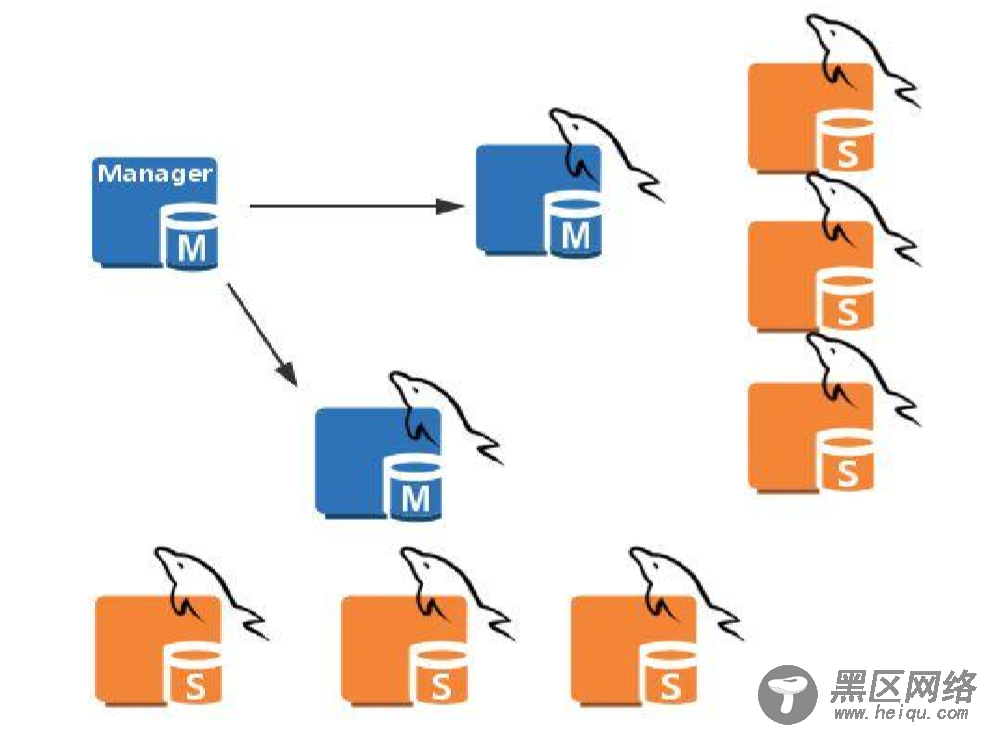
MHA是由一台manager服务器远程监控主服务器,当主服务器挂了提升一台从服务器作为主服务器。
当主节点挂了,manager首先要查看哪台从节点,同步的数据最多,然后提升同步最多的从节点为主节点,再将其余的MySQL服务器对他做从节点。
如果原主节点没彻底死透,manager会让新的主机通过ssh协议远程连接到原先的主节点,拉取二进制日志进行同步。如果主节死透了那就放弃。 MHA搭建 环境准备 一、准备4台主机,管理节点1台,主节点MySQL服务器1台,从节点MySQL服务器2台 主机IP
Manager 192.168.73.111
Master 192.168.73.110
Slave1 192.168.73.112
Slave2 192.168.73.113
二、将Manager管理节点配置为时间服务器,向所有MySQL服务器提供时间同步。
1.安装chrony服务
[root@Manager ~]# yum install -y chrony2.修改chrony配置文件
[root@Manager ~]# vim /etc/chrony.conf server 172.22.0.1 iburst allow 192.168.0.0/16 local stratum 103.启动chrony服务
[root@Manager ~]# systemctl start chronyd4.将MySQL服务器与Manager服务器进行时间同步
4.1在所有MySQL主机上修改配置文件并启动,并启动服务
4.2确认时间同步
[root@Master ~]# chronyc sources -v 210 Number of sources = 1 .-- Source mode '^' = server, '=' = peer, '#' = local clock. / .- Source state '*' = current synced, '+' = combined , '-' = not combined, | / '?' = unreachable, 'x' = time may be in error, '~' = time too variable. || .- xxxx [ yyyy ] +/- zzzz || Reachability register (octal) -. | xxxx = adjusted offset, || Log2(Polling interval) --. | | yyyy = measured offset, || \ | | zzzz = estimated error. || | | \ MS Name/IP address Stratum Poll Reach LastRx Last sample =============================================================================== ^* 192.168.73.111 4 6 377 54 +25us[ +41us] +/- 105ms 三、配置ssh为的密钥认证登陆当主节点宕机,manager会让从节点通过ssh协议去尝试连接主节点,并拉取二进制日志,所以要时用密钥的认证方式让从节点登陆到主节点拉取数据。
1.在manager服务器上生成私钥文件
2.将公钥文件复制给自己
[root@Manager ~]# ssh-copy-id 127.0.0.13.将整个~/.ssh目录复制给所有的MySQL主机
[root@Manager ~]# scp -r ~/.ssh 192.168.73.110:/root至此所有环境准备完毕
一、配置主从复制 主节点配置1.修改配置文件
[root@Master ~]# vim /etc/my.cnf [mysqld] server-id=1 log-bin binlog-format=row skip_name_resolve2.启动数据库服务
[root@Master ~]# systemctl start mariadb3.创建主从复制账号
[root@Master ~]# mysql -e "GRANT REPLICATION SLAVE ON *.* TO 'repluser'@'192.168.73.%' IDENTIFIED BY 'CentOS';"