
Slony是PostgreSQL领域中最广泛的复制解决方案之一。它不仅是最古老的复制实现之一,它也是一个拥有最广泛的外部工具支持的工具,比如pgAdmin3。多年来,Slony是在PostgreSQL中复制数据的惟一可行的解决方案。Slony使用逻辑复制;Slony-I一般要求表有主键,或者唯一键;Slony的工作不是基于PostgreSQL事务日志的;而是基于触发器的;基于逻辑复制高可用性;PostgreSQL除了slony;还有Londiste,BDR等等后续文章会讲到
1. 安装Slony
# tar -jxvf slony1-2.2.5.tar.bz2
# cd slony1-2.2.5
# ./configure --with-pgconfigdir=/opt/pgsql96/bin
# make
# make install
安装完成!
执行./configure时;会在当前目录是否可以找到pg_config命令;本例pg_config在/opt/pgsql96/bin目录下;
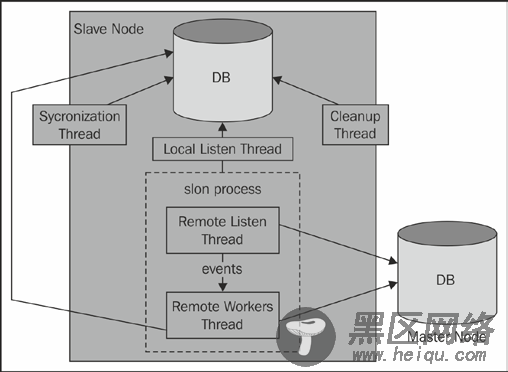
2. Slony架构图
3. 复制表
现有实验环境:
主机名 IP 角色PostgreSQL201 192.168.1.201 master
PostgreSQL202 192.168.1.202 slave
3.1 在两台数据库中都创建一个slony的超级用户;专为slony服务
create user slony superuser password 'li0924';
3.2 本实验两台主机都有lottu数据库;以lottu数据库中的表作为实验对象;在两个数据库中以相同的方式创建该表synctab,因为表结构不会自动复制。
create table synctab(id int primary key,name text);
3.3 在所有节点设置允许Slony-I用户远程登录;在pg_hba.conf文件添加
host all slony 192.168.1.0/24 trust
3.4 设置slony(在master主机操作)
编写一个slonik脚本用于注册这些节点的脚本如下所示:
[postgres@Postgres201 ~]$ cat slony_setup.sh
#!/bin/sh
MASTERDB=lottu
SLAVEDB=lottu
HOST1=192.168.1.201
HOST2=192.168.1.202
DBUSER=slony
slonik<<_EOF_
cluster name = first_cluster;
# define nodes (this is needed by pretty much
# all slonik scripts)
node 1 admin conninfo = 'dbname=$MASTERDB host=$HOST1 user=$DBUSER';
node 2 admin conninfo = 'dbname=$SLAVEDB host=$HOST2 user=$DBUSER';
# init cluster
init cluster ( id=1, comment = 'Master Node');
# group tables into sets
create set (id=1, origin=1, comment='Our tables');
set add table (set id=1, origin=1, id=1, fully qualified name = 'lottu.synctab', comment='sample table');
store node (id=2, comment = 'Slave node', event node=1);
store path (server = 1, client = 2, conninfo='dbname=$MASTERDB host=$HOST1 user=$DBUSER');
store path (server = 2, client = 1, conninfo='dbname=$SLAVEDB host=$HOST2 user=$DBUSER');
_EOF_
现在这个表在Slony的控制下,我们可以开始订阅脚本如下所示:
[postgres@Postgres201 ~]$ cat slony_subscribe.sh
#!/bin/sh
MASTERDB=lottu
SLAVEDB=lottu
HOST1=192.168.1.201
HOST2=192.168.1.202
DBUSER=slony
slonik<<_EOF_
cluster name = first_cluster;
node 1 admin conninfo = 'dbname=$MASTERDB host=$HOST1 user=$DBUSER';
node 2 admin conninfo = 'dbname=$SLAVEDB host=$HOST2 user=$DBUSER';
subscribe set ( id = 1, provider = 1, receiver = 2, forward = no);
_EOF_
在master主机执行脚本
[postgres@Postgres201 ~]$ ./slony_setup.sh
[postgres@Postgres201 ~]$ ./slony_subscribe.sh &
[1] 1225
定义了我们想要复制的东西之后,我们可以在每台主机启动slon守护进程
slon first_cluster 'host=192.168.1.201 dbname=lottu user=slony' &
slon first_cluster 'host=192.168.1.202 dbname=lottu user=slony' &
3.5 验证slony-I是否配置成功?
在master主机执行dml操作
[postgres@Postgres201 ~]$ psql lottu lottu
psql (9.6.0)
Type "help" for help.
lottu=# \d synctab
Table "lottu.synctab"
Column | Type | Modifiers
--------+---------+-----------
id | integer | not null
name | text |
Indexes:
"synctab_pkey" PRIMARY KEY, btree (id)
Triggers:
_first_cluster_logtrigger AFTER INSERT OR DELETE OR UPDATE ON synctab FOR EACH ROW EXECUTE PROCEDURE _first_cluster.logtrigger('_first_cluster', '1', 'k')
_first_cluster_truncatetrigger BEFORE TRUNCATE ON synctab FOR EACH STATEMENT EXECUTE PROCEDURE _first_cluster.log_truncate('1')
Disabled user triggers:
_first_cluster_denyaccess BEFORE INSERT OR DELETE OR UPDATE ON synctab FOR EACH ROW EXECUTE PROCEDURE _first_cluster.denyaccess('_first_cluster')
_first_cluster_truncatedeny BEFORE TRUNCATE ON synctab FOR EACH STATEMENT EXECUTE PROCEDURE _first_cluster.deny_truncate()
lottu=# insert into synctab values (1001,'lottu');
INSERT 0 1
在slave主机查看是否对应变化
[postgres@Postgres202 ~]$ psql
psql (9.6.0)
Type "help" for help.